
Every time I slice into a Boston cream cake, memories of my grandmother’s kitchen flood back. The rich custard, velvety chocolate, and tender cake layers represent more than just a dessert. They’re a cherished tradition passed down through generations.
If you’ve ever dreamed of creating the perfect homemade Boston cream cake, you’re in the right place. This classic American dessert combines luxurious flavors. It transforms an ordinary afternoon into a memorable culinary experience. Whether you’re baking for a special occasion or simply craving a sweet indulgence, this boston cream cake recipe will become your new favorite.
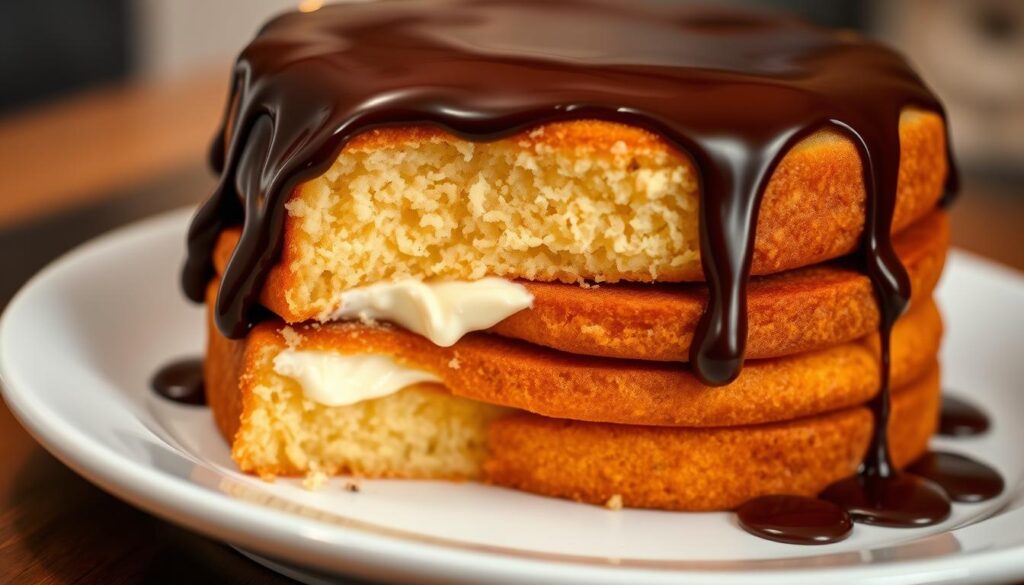
The best Boston cream cake isn’t just about following steps. It’s about understanding the delicate balance of textures and flavors. From the soft yellow cake to the silky vanilla custard and decadent chocolate glaze, each component plays a crucial role in creating a truly remarkable dessert.
Get ready to impress your family and friends with a homemade Boston cream cake that rivals any bakery’s version. With our detailed guide, you’ll master the techniques and secrets to creating a show-stopping treat. It will have everyone asking for seconds.
Table of Contents
The History and Origins of Boston Cream Cake
The Boston cream cake has a rich history in Massachusetts. It started as a simple dessert and became a beloved American treat. It still delights pastry lovers across the nation.
The story of this cake begins in the mid-19th century at the Parker House Hotel in Boston. This hotel was where a dessert was born that would become a staple in American baking.
The Parker House Hotel Legacy
In 1856, French pastry chef Augustine Sanzian created a revolutionary dessert at the Parker House Hotel. He combined delicate cake layers with rich vanilla custard and a chocolate glaze. This recipe set the standard for future bakers.
Evolution from Pie to Cake
The Boston cream cake was once called a “pie” because of how it was baked. Bakers used pie tins, which led to the name sticking even though it’s more like a cake.
- Original preparation used pie tins
- Layers of sponge cake replaced traditional pie crust
- Custard filling remained a signature element
Traditional Recipe Development
As the recipe spread, home bakers and chefs experimented with it. The Boston cream cake evolved, keeping its core elements. It became more refined with soft cake, creamy custard, and rich chocolate.
Knowing its history, you see the Boston cream cake as more than a dessert. It’s a delicious part of American culinary heritage.
Essential Ingredients for a Perfect Boston Cream Cake
To make a delicious boston cream cake, you need the right ingredients. These ingredients should be of high quality. This ensures your cake tastes great and feels right.
The best cake starts with top-notch ingredients. Each part is important for a rich, creamy, and indulgent dessert.
Key Ingredients for Your Cake
- All-purpose flour (for cake base)
- Granulated sugar
- Large eggs (room temperature)
- Unsalted butter
- Pure vanilla extract
- Baking powder
- Whole milk
Custard Filling Essentials
- Heavy cream
- Egg yolks
- Cornstarch
- Vanilla bean or pure vanilla extract
- Granulated sugar
Chocolate Ganache Topping
- High-quality dark chocolate
- Heavy cream
- Unsalted butter
When making your boston cream cake, the quality of ingredients is key. Fresh eggs, real vanilla, and top-notch chocolate make a big difference. They turn a simple cake into a special treat.
| Ingredient Category | Recommended Quality | Impact on Cake |
|---|---|---|
| Flour | Unbleached, all-purpose | Provides structure |
| Vanilla | Pure extract or vanilla bean | Enhances flavor depth |
| Chocolate | 70% dark chocolate | Rich ganache flavor |
| Eggs | Large, organic | Improves texture |
Pro tip: Always use room temperature ingredients for the most consistent and smooth homemade boston cream cake results.
Kitchen Tools and Equipment Needed
To make the perfect Boston cream cake, you need the right tools. Before you begin, get the essential equipment. This will make your baking smooth and fun.
Good bakers know the right tools make a big difference. The right equipment helps you make a delicious dessert that looks like it was made by a pro.
Baking Pans and Mixing Equipment
- 9×13 inch rectangular baking pan
- Stand mixer or hand mixer
- Two 9-inch round cake pans
- Parchment paper
- Cooling racks
Precise Measuring Tools
| Tool | Purpose |
|---|---|
| Measuring cups | Accurate dry and liquid ingredient measurements |
| Measuring spoons | Precise small quantity measurements |
| Digital kitchen scale | Consistent ingredient weighing |
Optional Specialty Items
These tools are not necessary but can make your Boston cream cake even better:
- Cake leveler for even layers
- Offset spatula for smooth frosting
- Piping bags and tips for decorative touches
- Instant-read thermometer for precise custard preparation
Quality baking tools are key to a stunning Boston cream cake. Each tool is important for turning simple ingredients into a tasty dessert.
Boston Cream Cake Recipe: Step-by-Step Instructions
Making a perfect boston cream cake needs focus. This easy recipe guides you through simple steps. It helps you make a tasty dessert.
- Prepare the Cake Layers
- Preheat your oven to 350°F (175°C)
- Grease two 9-inch round cake pans
- Mix dry ingredients in a large bowl
- Combine wet ingredients separately
- Blend wet and dry ingredients until smooth
- Make the Vanilla Custard Filling
- Whisk egg yolks in a medium saucepan
- Add sugar, cornstarch, and milk
- Cook over medium heat until thickened
- Remove from heat and add vanilla extract
- Cool completely before using
- Create the Chocolate Ganache
- Chop high-quality dark chocolate
- Heat heavy cream until just simmering
- Pour cream over chocolate
- Let sit for 3-4 minutes
- Whisk until smooth and glossy
Layering is key in your boston cream cake. Cool the cake layers, then spread custard between them. Pour chocolate ganache over the top, letting it flow down the sides.
| Ingredient | Quantity | Purpose |
|---|---|---|
| All-purpose flour | 2 cups | Cake base structure |
| Granulated sugar | 1½ cups | Sweetness and moisture |
| Eggs | 3 large | Binding and richness |
| Heavy cream | 1 cup | Ganache preparation |
| Dark chocolate | 8 oz | Ganache topping |
Chill the cake for at least an hour before serving. This lets the flavors mix and the ganache set perfectly.
Mastering the Light and Fluffy Cake Layers
To make the perfect homemade Boston cream cake, you need to master cake layer prep. The key to a great cake is its texture and technique. By learning how to mix, bake, and cool, you’ll make your cake truly special.
Proper Mixing Techniques
When mixing your cake batter, be precise. For a light and fluffy cake, follow these tips:
- Use room temperature ingredients for smoother blending
- Beat eggs and sugar until pale and creamy (3-5 minutes)
- Sift dry ingredients to prevent lumps
- Fold ingredients gently to maintain air bubbles
Baking Temperature and Timing
To get perfect cake layers, pay attention to temperature and time. Preheat your oven to 350°F. Use these strategies for baking:
- Prepare cake pans with parchment paper
- Tap pan gently to remove air bubbles
- Place pan in center rack for even heating
- Bake for 25-30 minutes until golden
Cooling Methods
Cooling is key for your best Boston cream cake. Let cakes rest in the pan for 10 minutes, then move to a wire rack. Cool completely before assembling to prevent filling from melting.
Creating the Perfect Vanilla Custard Filling

The heart of a delicious boston cream cake is its creamy vanilla custard filling. When making a boston cream cake from scratch, the custard is the star. It makes the whole dessert shine. You want a smooth, rich filling that goes well with the cake layers.
You can make the custard filling in two main ways:
- Quick Semi-Homemade Method
- Instant vanilla pudding mix
- Whole milk
- Cool Whip or whipped cream
- Traditional From-Scratch Method
- Heavy cream
- Egg yolks
- Granulated sugar
- Vanilla extract
- Cornstarch
For a traditional boston cream cake, making custard takes patience and care. Begin by whisking egg yolks with sugar until they’re light and creamy. Then, slowly add warm cream, stirring all the time to avoid lumps.
| Ingredient | Quantity | Purpose |
|---|---|---|
| Egg Yolks | 4-5 | Creates rich, smooth texture |
| Sugar | 1/2 cup | Adds sweetness and helps thicken |
| Heavy Cream | 2 cups | Provides luxurious consistency |
Pro tip: Always strain your custard through a fine-mesh sieve to ensure a silky-smooth texture in your delicious boston cream cake. Let the custard cool completely before assembling your cake to prevent soggy layers.
Chocolate Ganache Topping Techniques
Making the perfect chocolate ganache is key to the best Boston cream cake. This topping turns a simple dessert into a showstopper. It will wow anyone who tries it.
The secret to great ganache is using top-notch ingredients and a few tricks. Your choice of chocolate is crucial. It can make or break the dessert.
Selecting Premium Chocolate
When making your ganache, keep these tips in mind:
- Go for high-quality semi-sweet chocolate with 55-65% cocoa content
- Opt for chocolate from well-known brands like Ghirardelli or Valrhona
- Stay away from chocolate chips, as they have additives that stop them from melting smoothly
Achieving Ganache Perfection
Here’s how to make a smooth chocolate topping:
- Chop chocolate into small, even pieces
- Heat heavy cream until it starts to simmer
- Pour hot cream over chocolate and wait 2-3 minutes
- Stir gently until it’s smooth and shiny
| Ingredient | Quantity | Purpose |
|---|---|---|
| Semi-sweet Chocolate | 8 oz | Primary flavor base |
| Heavy Cream | 1 cup | Creates smooth consistency |
| Corn Syrup | 1 tbsp | Adds shine and prevents crystallization |
Pro tip: Cool your ganache a bit before pouring. This ensures a beautiful drip effect on your Boston cream cake. Your dessert will look and taste amazing.
Assembly Tips and Techniques
Making a perfect homemade boston cream cake needs careful assembly. You must be precise and gentle with the cake layers. The right method turns simple parts into a beautiful dessert that will wow everyone.
Here are the key steps for assembling your boston cream cake:
- Let cake layers cool completely before starting
- Use a serrated knife to level cake layers if needed
- Create a dam of frosting around cake edges to prevent filling from spilling
- Spread custard filling evenly using an offset spatula
Pro tip: Chill the cake layers for 15-20 minutes before adding filling to prevent crumbling and ensure cleaner cuts.
“Patience is key when assembling a boston cream cake – take your time and handle layers gently.” – Professional Pastry Chef
The assembly process is all about layering right. Start with the first cake layer on your plate, then add a lot of vanilla custard. Carefully put the second layer on top.
| Assembly Stage | Key Technique |
|---|---|
| Bottom Layer Placement | Centered on serving plate |
| Custard Filling | Spread evenly, leave small border |
| Top Layer Positioning | Gently place, avoid pressing down |
| Chocolate Ganache | Pour from center, allow natural drape |
Finally, pour rich chocolate ganache over the top. Let it flow down the sides of your cake. Your homemade boston cream cake will look and taste amazing.
Storage and Serving Recommendations
Keeping your Boston cream cake fresh is key. It’s important to store and serve it right. This way, the cake stays tasty and moist for days.

After baking your Boston cream cake, it’s vital to refrigerate it fast. The cake’s custard and chocolate ganache need special care. This helps keep the cake fresh and full of flavor.
Refrigeration Guidelines
- Store the cake in an airtight container
- Place in the refrigerator within 2 hours of preparation
- Keep cake covered to prevent moisture loss
Shelf Life and Storage
| Storage Location | Maximum Duration | Quality Preservation |
|---|---|---|
| Refrigerator | Up to 6 days | Best flavor and texture |
| Countertop | 4-6 hours | Not recommended |
Serving Temperature Recommendations
For the best taste, take the cake out of the fridge 15-20 minutes before you serve it. This lets it get to a slightly chilled but not cold state. It makes the cake’s flavor and texture perfect.
- Remove cake 15-20 minutes before serving
- Let sit at room temperature
- Slice with a clean, sharp knife
By sticking to these tips, your Boston cream cake will stay fresh and delicious. It will impress your guests every time.
Common Mistakes to Avoid
Making the best Boston cream cake from scratch needs careful work. Even skilled bakers can face problems that affect the cake’s quality. Knowing these issues helps you make a perfect dessert every time.
- Overmixing the Batter: Overmixing is a big mistake when making Boston cream cake. It makes the cake tough and dense instead of light and fluffy.
- Improper Cooling: Cooling the cake too fast can ruin its structure. It also makes it hard to put the cake together.
- Temperature Mistakes: Using chocolate ganache at the wrong temperature can cause a messy, uneven top.
To bake a great Boston cream cake, you need to be careful. Make sure your ingredients are at room temperature. Also, follow the mixing instructions closely to keep the cake’s structure delicate.
| Mistake | Consequence | Solution |
|---|---|---|
| Overmixing Batter | Tough, dense cake | Mix until ingredients are just combined |
| Hot Ganache Application | Runny, uneven topping | Let ganache cool to lukewarm before spreading |
| Incomplete Cake Cooling | Structural collapse | Allow cake to cool completely before filling |
Professional bakers know that making the best Boston cream cake takes patience and precision. By avoiding these common mistakes, you’ll improve your baking skills. You’ll make a stunning dessert that will wow everyone.
Make-Ahead and Freezing Instructions
Planning ahead can make your easy boston cream cake recipe easier. You can prepare parts of your homemade Boston cream cake in advance. This saves time and reduces stress on serving day.
When making your cake layers, you have several options. The cake layers can be frozen for up to three months. This is great for bakers who want to spread out their work.
- Cool cake layers completely after baking
- Wrap each layer individually in plastic wrap
- Place wrapped layers in a freezer-safe container
- Label with the date of freezing
Pro tip: Always freeze cake layers before they are filled or frosted to maintain the best texture and prevent moisture buildup.
For the custard filling and chocolate ganache, prepare them a few days in advance. Store the custard in an airtight container in the fridge for up to 3 days. The ganache can be made ahead and gently reheated before use.
Important caution: While cake layers can be frozen, do not freeze the fully assembled Boston cream cake. The moisture and delicate components will compromise the cake’s texture and taste.
By using these make-ahead strategies, you’ll create a stress-free baking experience. This allows you to enjoy the process of crafting a delicious homemade Boston cream cake.
Conclusion
Making a classic Boston cream cake at home is more than baking. It’s about creating a special culinary experience. This connects you to a rich American dessert tradition.
Each step you’ve learned turns simple ingredients into a delicious masterpiece. This masterpiece will impress your family and friends.
Your homemade Boston cream cake is a perfect mix of soft cake, creamy vanilla custard, and rich chocolate ganache. The skills you’ve gained are not just for this recipe. They can be used for many other sweet treats.
Baking is all about patience and passion. Don’t worry if your first try isn’t perfect. Every Boston cream cake you make will make you better.
Share your baking stories with others, swap tips, and enjoy the journey. The joy is in the making as much as in the eating.
We encourage you to try new things, make it your own, and enjoy the sweet fruits of your labor. Your kitchen is now ready to create a dessert that’s as good as any bakery’s.